


Table of contents
- Step One is Install 🍺 Homebrew.
- Next, Let's Install Some Apps
- Let's Install OH-MY-ZSH and Prompt
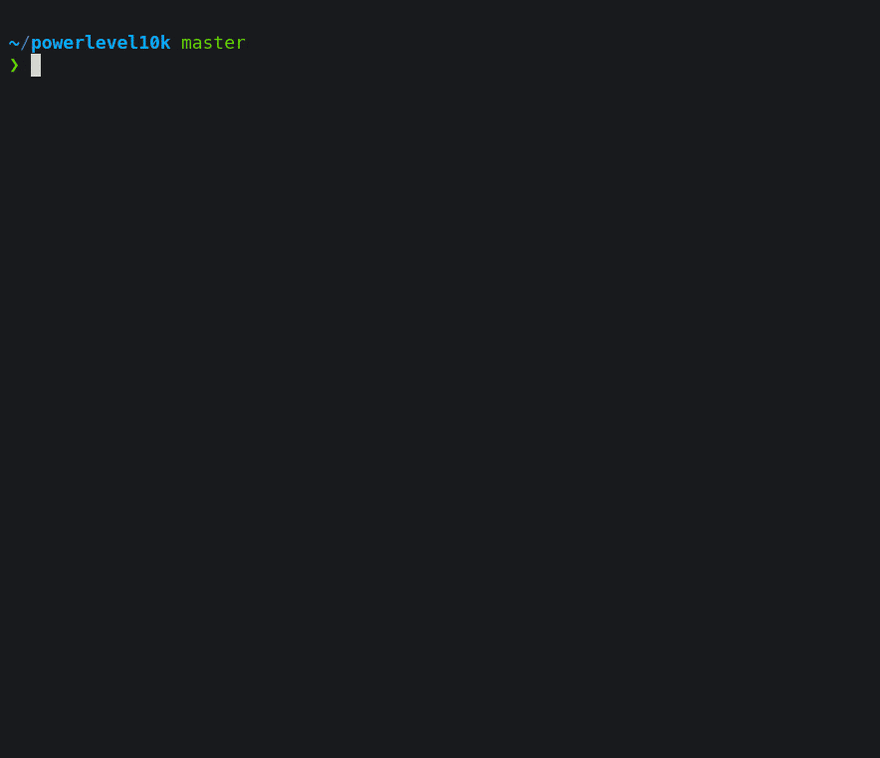
- Installing Powerlevel10k Theme
- Let's add iTerm2's Shell Utilities
- Let's add syntax highlighting to Nano
- Now let's fix up Quicklook real quick and add some features
- Let's add allow using our thumbprint to sudo
- Adding more Aliases for EXA and BAT
- Using BAT, the CAT replacement
Step One is Install 🍺 Homebrew.
Open a terminal and enter the following commands. If you already have a working Homebrew installed, you can skip to Step 3
# First, we need to install the basics. You will be asked to enter your password during this process
xcode-select --install

# After xCode is installed we can install homebrew
/bin/bash -c "$(curl -fsSL https://raw.githubusercontent.com/Homebrew/install/HEAD/install.sh)"

# After succeessful homebrew install it should give you two commands to run
echo 'eval "$(/opt/homebrew/bin/brew shellenv)"' >> ~/.zprofile
eval "$(/opt/homebrew/bin/brew shellenv)"

# Now open a new terminal and run brew doctor
brew doctor
Next, Let's Install Some Apps
My personal list of must-have applications is as follows
iTerm2 - The best terminal on OSX, period.
Cheatsheet - Tells you all the hotkeys the current App has just by holding CMD down
MyCLI MySQL CLI client with Syntax Highlighting and Autocomplete.
BAT A syntax-highlighted, searchable, mouse-scrollable version of CAT.
EXA A much better version of LS
Speedtest-CLI Run a speed test from your CLI.
brew install --cask iterm2
brew install --cask cheatsheet
brew install mas-cli/tap/mas
brew install mycli
brew install bat
brew install exa
brew install speedtest-cli
Let's Install OH-MY-ZSH and Prompt
# First let's install OH My ZSH
sh -c "$(curl -fsSL https://raw.githubusercontent.com/robbyrussell/oh-my-zsh/master/tools/install.sh)"

# Install zsh-autosuggestions
git clone https://github.com/zsh-users/zsh-autosuggestions ${ZSH_CUSTOM:-~/.oh-my-zsh/custom}/plugins/zsh-autosuggestions

# Install zsh-syntax-highlighting using Oh-my-zsh (Preferred)
git clone https://github.com/zsh-users/zsh-syntax-highlighting.git ${ZSH_CUSTOM:-~/.oh-my-zsh/custom}/plugins/zsh-syntax-highlighting

# Now add them to the .zshrc plugins
nano ~/.zshrc

# find the plugins and add both of these
plugins=(zsh-autosuggestions zsh-syntax-highlighting)

# While you are in .zshrc go ahead and add the following near the bottom change username with your username.

if [ -f "/Users/username/.aliases" ]; then
   source /Users/username/.aliases
fi

# Save the file and Open a new terminal tab to verify your ZSH is working.
Installing Powerlevel10k Theme
Run the following commands to install Powerlevel10k
# gh cli
gh repo clone romkatv/powerlevel10k $ZSH_CUSTOM/themes/powerlevel10k

# git
git clone https://github.com/romkatv/powerlevel10k.git $ZSH_CUSTOM/themes/powerlevel10k
Enabling PowerLevel10k
Then you need to enable it change the value of ZSH_THEME to the following in ~/.zshrc file :
ZSH_THEME="powerlevel10k/powerlevel10k"
Configuring PowerLevel10k
Make sure your terminal font is FiraCode NF.
You can get it at https://fonts.google.com/specimen/Fira+Code install the whole family. Using OSX's FontBook. And set your terminal font to FiraCode NF
And to configure your prompt run the following command
p10k configure
Another good prompt I have used for a long time is Spaceship Prompt which offers a powerful prompt with very configurable options, but lately, I like PowerLevel10k.
Let's add iTerm2's Shell Utilities
iTerm2 has some really useful utilities, so let's add some aliases to make them easier to remember and use.
First, I suggest reading the Iterm2 Shell Utilities
After that, let's add some aliases to our aliases file. I always create a .aliases file in my home directory and include it in my .zshrc I suggest leaving this file open in your editor.
## IMG CAT Alias
alias icat="imgcat $1"
## LS with Image Previews
alias ils="imgls"
## Copy to clipboard
alias icp="it2copy $1"
## Download from SSH to your Downloads folder
alias idl="it2dl $1"
## Upload Filename through SSH
alias iup="it2ul $1 -c -z -v -f"
Let's add syntax highlighting to Nano
Now let's spruce up Nano with some syntax highlighting by running the following commands in iTerm2.
# install nano from homebrew
brew install nano nanorc

# update your .nanorc file
echo 'include "/opt/homebrew/share/nanorc/*.nanorc"' >> ~/.nanorc

# Close and re-open your terminal, and you'll have syntax highlighting
Now let's fix up Quicklook real quick and add some features
Let's add Quicklook plugins to make Quicklook more useful. The plugins installed have the following usage.
qlcolorcode- Preview source code files with syntax highlightingqlstephen- Preview plain text files without or with an unknown file extension.qlmarkdown- Preview Markdown filesquicklook-json- Preview JSON filesqlimagesize- Display image size and resolutionsuspicious-package- Preview the contents of a standard Apple installer packageapparency- Preview the contents of a macOS appquicklookase- Preview Adobe ASE Color Swatches generated with Adobe Photoshop, Adobe Illustrator, Adobe Color CC, Spectrum, COLOURlovers, Prisma, among many others.qlvideo-Preview most types of video files, as well as their thumbnails, cover art and metadatasyntax-highlight- Preview many different source code files
brew install qlcolorcode qlstephen qlmarkdown quicklook-json qlimagesize suspicious-package apparency quicklookase qlvideo

brew install --cask --no-quarantine syntax-highlight

# To get plugins working in Catalina, you will need to remove the quarantine attribute.
#Run this to see the attributes:
xattr -r ~/Library/QuickLook
#And run this to remove the attributes:
xattr -d -r com.apple.quarantine ~/Library/QuickLook
Let's add allow using our thumbprint to sudo
# First open the following file with sudo
sudo /etc/pam.d/sudo
# Add the following line at the very top and save
auth sufficient pam_tid.so
# Finally run this command
defaults write com.apple.security.authorization ignoreArd -bool TRUE
Fixing iTerm2 to allow using the thumbprint
The default terminal works like a charm, but iTerm2 needs an extra configuration. Go to Prefs -> Advanced -> Allow sessions to survive logging out and back in and set the value to no.
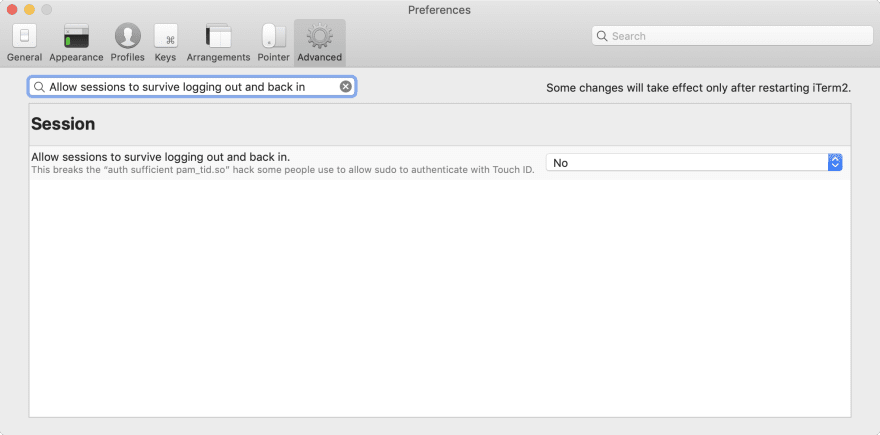
Now logout and back in, and both the default terminal and iTerm should allow using the Thumbprint instead of entering a password when sudoing
Adding more Aliases for EXA and BAT
If you kept your .aliases file open, then add the following aliases. Otherwise, reopen it and add the following aliases.
## Alias to make LS look like this
alias ls="exa --icons -lh"
Now my prompt at the bottom is set up using Power10k, but you can see how it adds icons to the different file types and such.
While you have the .aliases file open, let's add a few more aliases I find useful.
# Copies you public key to your clip board
alias pubkey="more ~/.ssh/id_rsa.pub | pbcopy | echo '=> Public key copied to pasteboard.'"
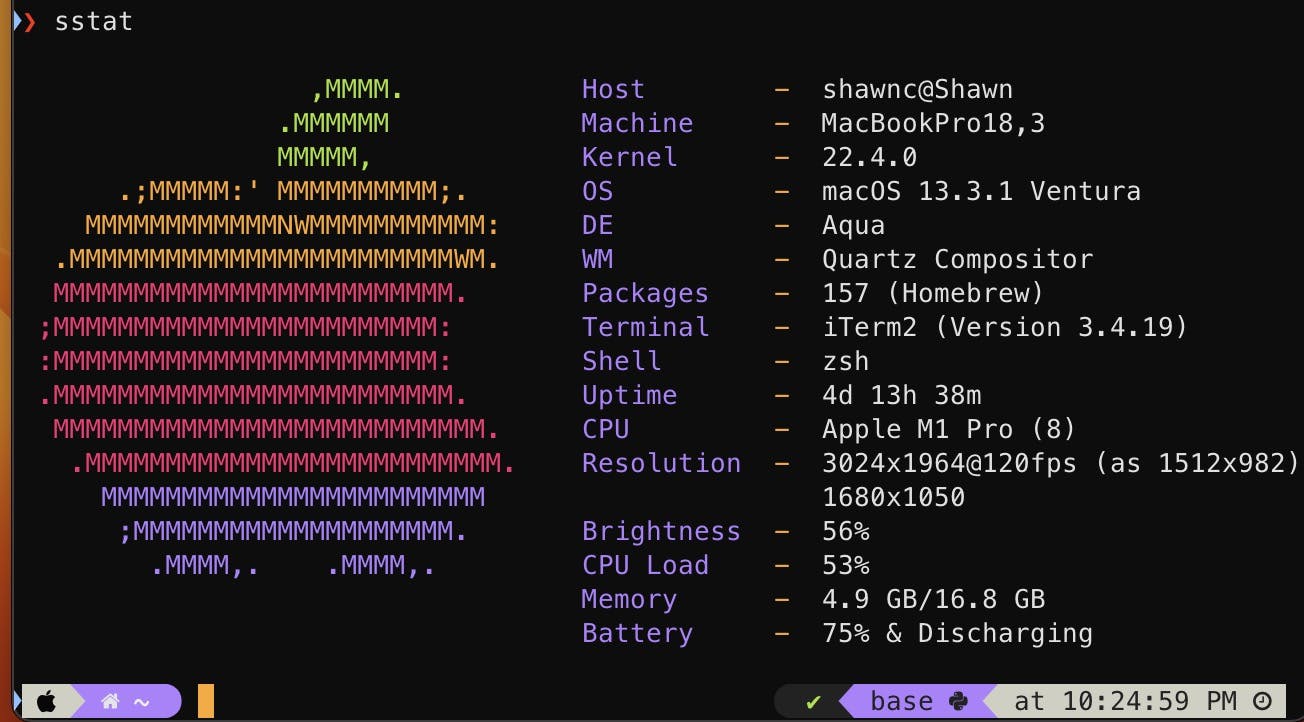
# Stat Provides a Nice looking CLI Stats
alias sstat="macchina"
## I use VSC Insider, if you don't use Insiders you dont need this
alias code="code-insiders $1"
## Reload apache
alias rapache="sudo systemctl reload apache2"
# dump autoloader and optimize autoloader
alias cda="composer dumpautoload -o --dev"
# bulk association again if you don't use VSC Insiders just put code
alias -s {md,css,php,js,json,html}=code-insiders
macchina or the alias sstat will render a CLI CPU Stats that looks like this
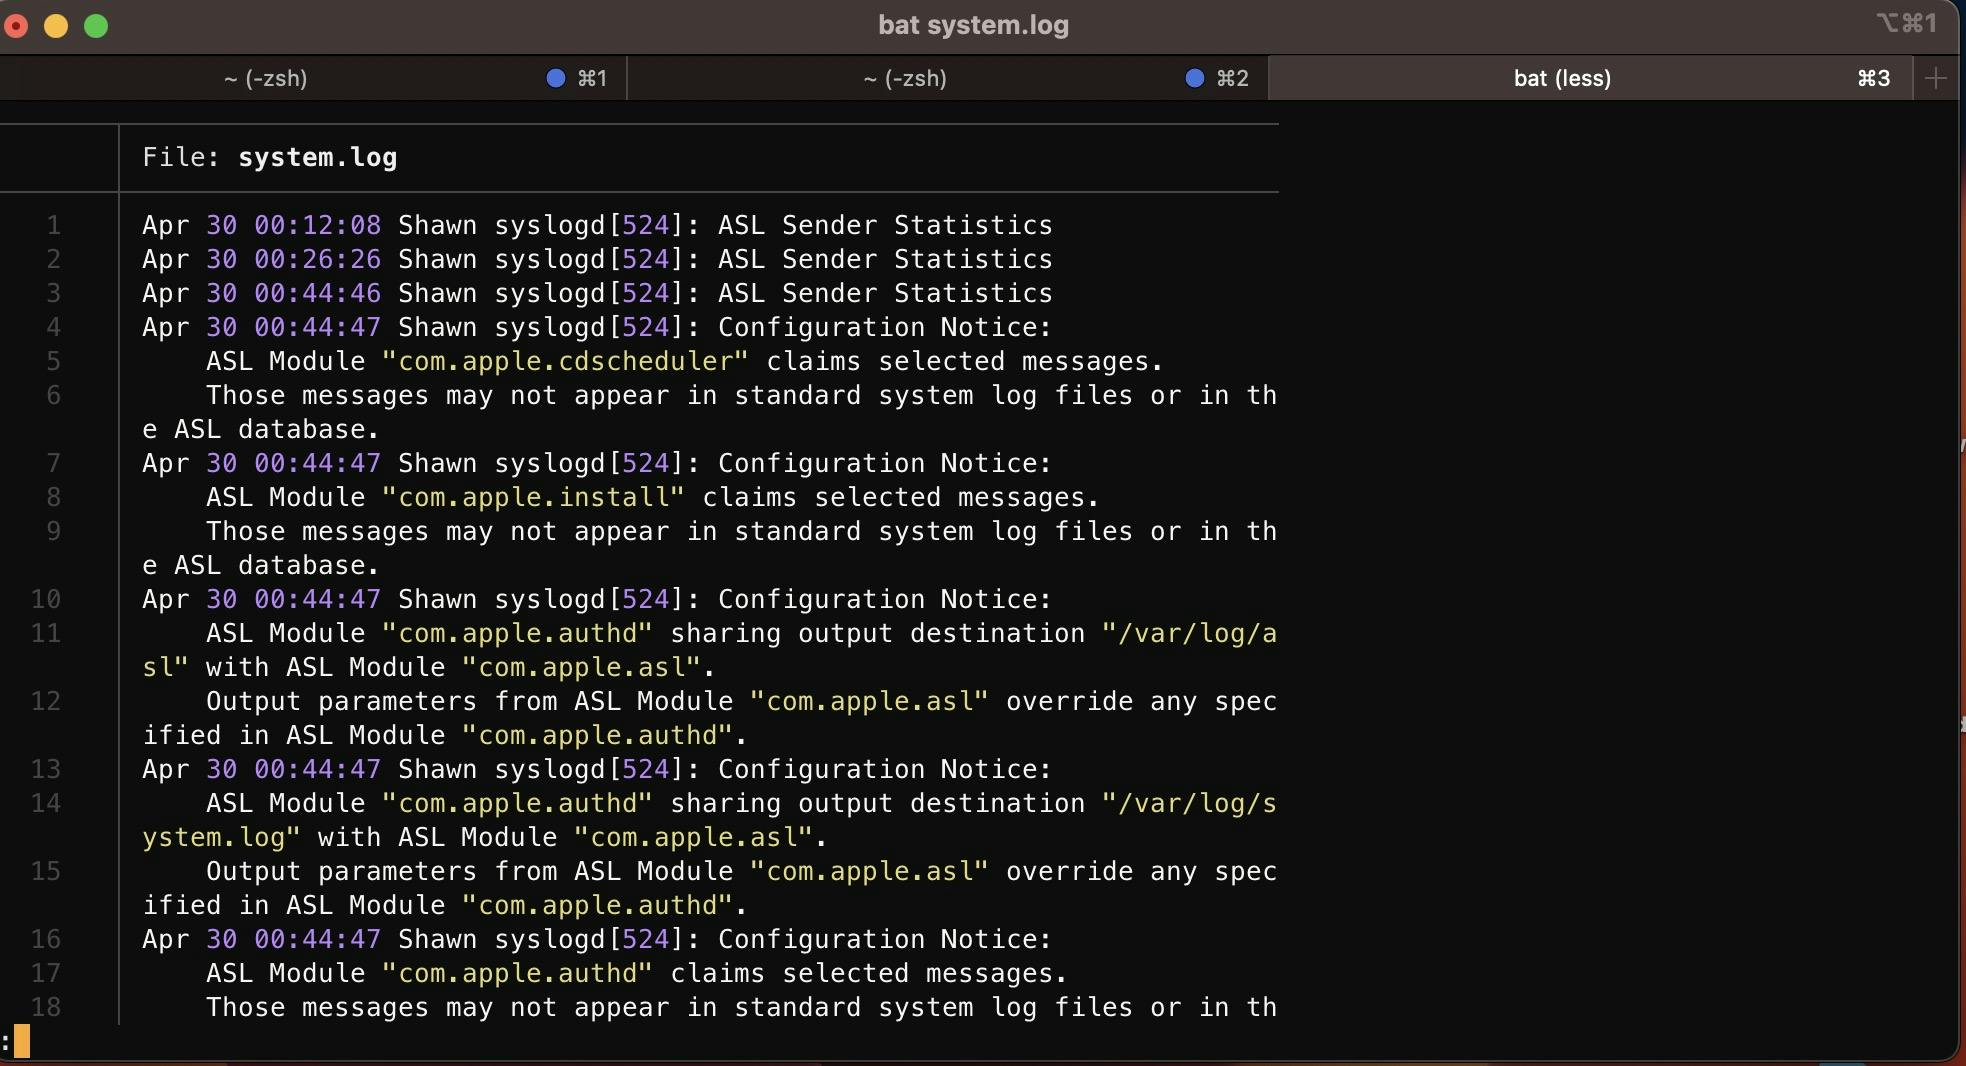
Using BAT, the CAT replacement
Sometimes, I like CAT to grep it and find specific things. Other times like log files, I want to be able to search and use the mouse to scroll through it, like this. It offers search and mouse scrolling and a lot of other commands.
If you can't figure out how to exit, it's like Vim type:q, but there are other commands you can use with: I suggest reading the docs on BAT.
I have some more tools, but this article is getting pretty long, so stay tuned for the following article, which will expand on this one.